Python Usage
8x8 LED Matrices
For the matrix device, initialize the luma.led_matrix.device.max7219
class, as follows:
from luma.core.interface.serial import spi, noop
from luma.core.render import canvas
from luma.led_matrix.device import max7219

serial = spi(port=0, device=0, gpio=noop())
device = max7219(serial)
The display device should now be configured for use. The specific
max7219 class exposes a
display() method which takes an image
with attributes consistent with the capabilities of the configured device’s
capabilities. However, for most cases, for drawing text and graphics primitives,
the canvas class should be used as follows:
from PIL import ImageFont

font = ImageFont.truetype("examples/pixelmix.ttf", 8)

with canvas(device) as draw:
    draw.rectangle(device.bounding_box, outline="white", fill="black")
The luma.core.render.canvas class automatically creates an
PIL.ImageDraw object of the correct dimensions and bit depth suitable
for the device, so you may then call the usual Pillow methods to draw onto the
canvas.
As soon as the with scope is ended, the resultant image is automatically
flushed to the device’s display memory and the PIL.ImageDraw object is
garbage collected.
Note
The default Pillow font is too big for 8px high devices like the LED matrices here, so the luma.examples repo inclues a small TTF pixel font called pixelmix.ttf (attribution: http://www.dafont.com/) which just fits.
Alternatively, a set of “legacy” fixed-width bitmap fonts are included in the luma.core codebase and may be used as follows:
from luma.core.legacy import text
from luma.core.legacy.font import proportional, CP437_FONT, LCD_FONT

with canvas(device) as draw:
    text(draw, (0, 0), "A", fill="white", font=proportional(CP437_FONT))
The fixed-width fonts can be “converted” on-the-fly to proportionally
spaced by wrapping them with the luma.core.legacy.font.proportional
class.
Scrolling / Virtual viewports
A single 8x8 LED matrix clearly hasn’t got a lot of area for displaying useful
information. Obviously they can be daisy-chained together to provide a longer
line of text, but as this library extends luma.core,
then we can use the luma.core.virtual.viewport class to allow
scrolling support:
import time

from luma.core.interface.serial import spi, noop
from luma.core.render import canvas
from luma.core.virtual import viewport
from luma.led_matrix.device import max7219

serial = spi(port=0, device=0, gpio=noop())
device = max7219(serial)

virtual = viewport(device, width=200, height=100)

with canvas(virtual) as draw:
    draw.rectangle(device.bounding_box, outline="white", fill="black")
    draw.text((3, 3), "Hello world", fill="white")

for offset in range(8):
    virtual.set_position((offset, offset))
    time.sleep(0.1)
Calling set_position() on a virtual
viewport, causes the device to render what is visible at that specific
position; altering the position in a loop refreshes every time it is called,
and gives an animated scrolling effect.
By altering both the X and Y co-ordinates allows scrolling in any direction, not just horizontally.
Color Model
Any of the standard PIL.ImageColor color formats may be used, but since
the 8x8 LED Matrices are monochrome, only the HTML color names "black" and
"white" values should really be used; in fact, by default, any value
other than black is treated as white. The luma.core.render.canvas
constructor does have a dither flag which if set to
True, will convert color drawings to a dithered monochrome effect.
with canvas(device, dither=True) as draw:
    draw.rectangle(device.bounding_box, outline="white", fill="red")
Landscape / Portrait Orientation
By default, cascaded matrices will be oriented in landscape mode. Should you
have an application that requires the display to be mounted in a portrait
aspect, then add a rotate=N parameter when creating the device:
from luma.core.interface.serial import spi, noop
from luma.core.render import canvas
from luma.led_matrix.device import max7219

serial = spi(port=0, device=0, gpio=noop())
device = max7219(serial, rotate=1)

# Box and text rendered in portrait mode
with canvas(device) as draw:
    draw.rectangle(device.bounding_box, outline="white", fill="black")
N should be a value of 0, 1, 2 or 3 only, where 0 is no rotation, 1 is rotate 90° clockwise, 2 is 180° rotation and 3 represents 270° rotation.
The device.size, device.width and device.height
properties reflect the rotated dimensions rather than the physical dimensions.
Daisy-chaining
The MAX7219 chipset supports a serial 16-bit register/data buffer which is clocked in on pin DIN every time the clock edge falls, and clocked out on DOUT 16.5 clock cycles later. This allows multiple devices to be chained together.
If you have more than one device and they are daisy-chained together, you can
initialize the library in one of two ways, either using cascaded=N
to indicate the number of daisychained devices:
from luma.core.interface.serial import spi, noop
from luma.core.render import canvas
from luma.led_matrix.device import max7219

serial = spi(port=0, device=0, gpio=noop())
device = max7219(serial, cascaded=3)

with canvas(device) as draw:
   draw.rectangle(device.bounding_box, outline="white", fill="black")
Using cascaded=N implies there are N devices arranged linearly and
horizontally, running left to right.
Alternatively, the device configuration may configured with width=W
and height=H. These dimensions denote the number of LEDs in the all
the daisychained devices. The width and height must both be multiples of 8:
this has scope for arranging in blocks in, say 3x3 or 5x2 matrices (24x24 or
40x16 pixels, respectively).
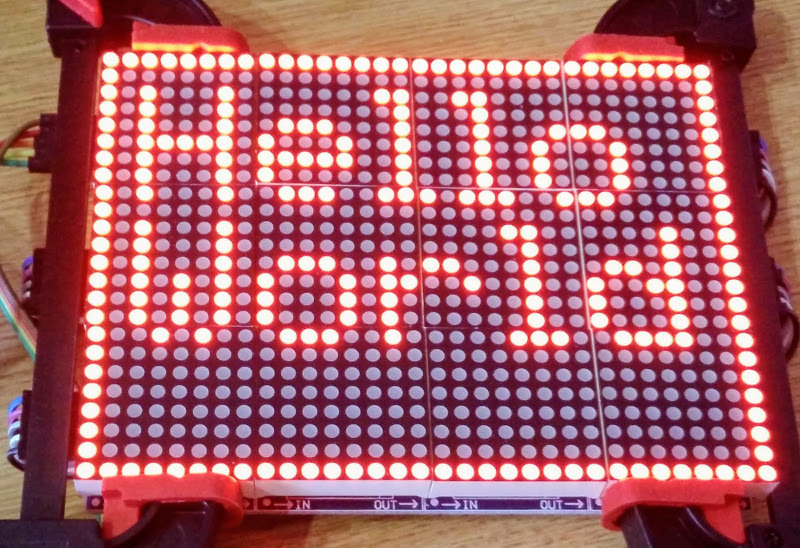
Given 12 daisychained MAX7219’s arranged in a 4x3 layout, the simple example below,
from luma.core.interface.serial import spi, noop
from luma.core.render import canvas
from luma.core.legacy import text
from luma.core.legacy.font import proportional, LCD_FONT
from luma.led_matrix.device import max7219

serial = spi(port=0, device=0, gpio=noop())
device = max7219(serial, width=32, height=24, block_orientation=-90)

with canvas(device) as draw:
   draw.rectangle(device.bounding_box, outline="white")
   text(draw, (2, 2), "Hello", fill="white", font=proportional(LCD_FONT))
   text(draw, (2, 10), "World", fill="white", font=proportional(LCD_FONT))
displays as:
Trouble-shooting / common problems
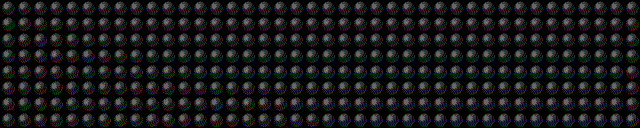
Some online retailers are selling pre-assembled ‘4-in-1’ LED matrix displays, but they appear to be wired 90° out-of-phase such that horizontal scrolling appears as below:
This can be rectified by initializing the max7219
device with a parameter of block_orientation=-90 (or +90, if your device is
aligned the other way):
from luma.core.interface.serial import spi, noop
from luma.core.render import canvas
from luma.led_matrix.device import max7219

serial = spi(port=0, device=0, gpio=noop())
device = max7219(serial, cascaded=4, block_orientation=-90)
Every time a display render is subsequenly requested, the underlying image representation is corrected to reverse the 90° phase shift.
Similarly, in other pre-assembled configurations, the 4-in-1 blocks arrange the 8x8 blocks in reverse order. In that case, you need to pass a True value to parameter blocks_arranged_in_reverse_order, requesting an additional pre-processing step that fixes this:
...
device = max7219(serial, cascaded=4, block_orientation=-90,
                 blocks_arranged_in_reverse_order=True)
7-Segment LED Displays
For the 7-segment device, initialize the luma.core.virtual.sevensegment
class, and wrap it around a previously created max7219
device:
from luma.core.interface.serial import spi, noop
from luma.core.render import canvas
from luma.core.virtual import sevensegment
from luma.led_matrix.device import max7219

serial = spi(port=0, device=0, gpio=noop())
device = max7219(serial, cascaded=2)
seg = sevensegment(device)
The seg instance now has a text
property which may be assigned, and when it does will update all digits
according to the limited alphabet the 7-segment displays support. For example,
assuming there are 2 cascaded modules, we have 16 character available, and so
can write:
seg.text = "Hello world"
Rather than updating the whole display buffer, it is possible to update ‘slices’, as per the below example:
seg.text[0:5] = "Goodbye"
This replaces Hello in the previous example, replacing it with Gooobye.
The usual python idioms for slicing (inserting / replacing / deleteing) can be
used here, but note if inserted text exceeds the underlying buffer size, a
ValueError is raised.
Floating point numbers (or text with ‘.’) are handled slightly differently - the decimal-place is fused in place on the character immediately preceding it. This means that it is technically possible to get more characters displayed than the buffer allows, but only because dots are folded into their host character
WS2812 NeoPixels
For a strip of neopixels, initialize the luma.led_matrix.device.ws2812
class (also aliased to luma.led_matrix.device.neopixel), supplying a
parameter cascaded=N where N is the number of daisy-chained LEDs.
This script creates a drawing surface 100 pixels long, and lights up three specific pixels, and a contiguous block:
from luma.core.render import canvas
from luma.led_matrix.device import ws2812

device = ws2812(cascaded=100)

with canvas(device) as draw:
    draw.point((0,0), fill="white")
    draw.point((4,0), fill="blue")
    draw.point((11,0), fill="orange")
    draw.rectange((20, 0, 40, 0), fill="red")
If you have a device like Pimoroni’s Unicorn pHat,
initialize the device with width=N and height=N attributes instead:
from luma.core.render import canvas
from luma.led_matrix.device import ws2812

# Pimoroni's Unicorn pHat is 8x4 neopixels
device = ws2812(width=8, height=4)

with canvas(device) as draw:
    draw.line((0, 0, 0, device.height), fill="red")
    draw.line((1, 0, 1, device.height), fill="orange")
    draw.line((2, 0, 2, device.height), fill="yellow")
    draw.line((3, 0, 3, device.height), fill="green")
    draw.line((4, 0, 4, device.height), fill="blue")
    draw.line((5, 0, 5, device.height), fill="indigo")
    draw.line((6, 0, 6, device.height), fill="violet")
    draw.line((7, 0, 7, device.height), fill="white")
Note
The ws2812 driver uses the ws2812
PyPi package to interface to the daisychained LEDs. It uses DMA (direct memory
access) via /dev/mem which means that it has to run in privileged mode
(via sudo root access).
The same viewport, scroll support, portrait/landscape orientation and color model idioms provided in luma.core are equally applicable to the ws2812 implementation.
Pimoroni Unicorn HAT
Pimoroni sells the Unicorn HAT, comprising 64 WS2812b NeoPixels in an 8x8 arrangement. The pixels are cascaded, but arranged in a ‘snake’ layout, rather than a ‘scan’ layout. In order to accomodate this, a translation mapping is required, as follows:
import time

from luma.led_matrix.device import ws2812, UNICORN_HAT
from luma.core.render import canvas

device = ws2812(width=8, height=8, mapping=UNICORN_HAT)

for y in range(device.height):
    for x in range(device.width):
        with canvas(device) as draw:
            draw.point((x, y), fill="green")
        time.sleep(0.5)
This should animate a green dot moving left-to-right down each line.
Pimoroni Unicorn HAT HD
Pimoroni sells the Unicorn HAT HD, comprising 256 high-intensity RGB LEDs in a 16x16 arrangement. The pixels are driven by an ARM STM32F making the display appear as an SPI device:
import time

from luma.led_matrix.device import unicornhathd
from luma.core.interface.serial import spi, noop
from luma.core.render import canvas

serial = spi(port=0, device=0, gpio=noop())
device = unicornhathd(serial)

for y in range(device.height):
    for x in range(device.width):
        with canvas(device) as draw:
            draw.point((x, y), fill="green")
        time.sleep(0.5)
This should animate a green dot moving left-to-right down each line.
NeoSegments (WS2812)
@msurguy has crowdsourced some WS2812 neopixels into a modular 3D-printed seven-segment unit. To program these devices:
import time

from luma.led_matrix_device import neosegment

neoseg = neosegment(width=6)

# Defaults to "white" color initially
neoseg.text = "NEOSEG"
time.sleep(1)

# Set the first char ('N') to red
neoseg.color[0] = "red"
time.sleep(1)

# Set fourth and fifth chars ('S','E') accordingly
neoseg.color[3:5] = ["cyan", "blue"]
time.sleep(1)

# Set the entire string to green
neoseg.color = "green"
The neosegment class extends sevensegment,
so the same text assignment (Python slicing paradigms) can be used here as well -
see the earlier section for further details.
The underlying device is exposed as attribute device, so methods
such as show, hide and contrast are available.
Next-generation APA102 NeoPixels
APA102 RGB neopixels are easier to control that WS2812 devices - they are driven
using SPI rather than precise timings that the WS2812 devices need. Initialize the
luma.led_matrix.device.apa102 class, supplying a parameter
cascaded=N where N is the number of daisy-chained LEDs.
The following script creates a drawing surface 8 pixels long, and lights up three specific pixels:
from luma.core.render import canvas
from luma.led_matrix.device import apa102

device = apa102(cascaded=8)

with canvas(device) as draw:
    draw.point((0,0), fill="white")
    draw.point((0,1), fill="blue")
    draw.point((0,2), fill=(0xFF, 0x00, 0x00, 0x80))  # RGBA tuple, alpha controls brightness
APA102 RGB pixels can have their brightness individually controlled: by setting the alpha chanel to a translucent value (as per the above example) will set the brightness accordingly.
Emulators
There are various display emulators available for running code against, for debugging and screen capture functionality:
The
luma.emulator.device.capturedevice will persist a numbered PNG file to disk every time itsdisplay()method is called.The
luma.emulator.device.gifanimdevice will record every image when itsdisplay()method is called, and on program exit (or Ctrl-C), will assemble the images into an animated GIF.The
luma.emulator.device.pygamedevice uses thepygamelibrary to render the displayed image to a pygame display surface.
Invoke the demos with:
$ python examples/clock.py -d capture --transform=led_matrix
or:
$ python examples/clock.py -d pygame --transform=led_matrix
Note
Pygame is required to use any of the emulated devices, but it is NOT
installed as a dependency by default, and so must be manually installed
before using any of these emulation devices (e.g. pip install pygame).
See the install instructions in luma.emulator
for further details.